Appearance
Quests
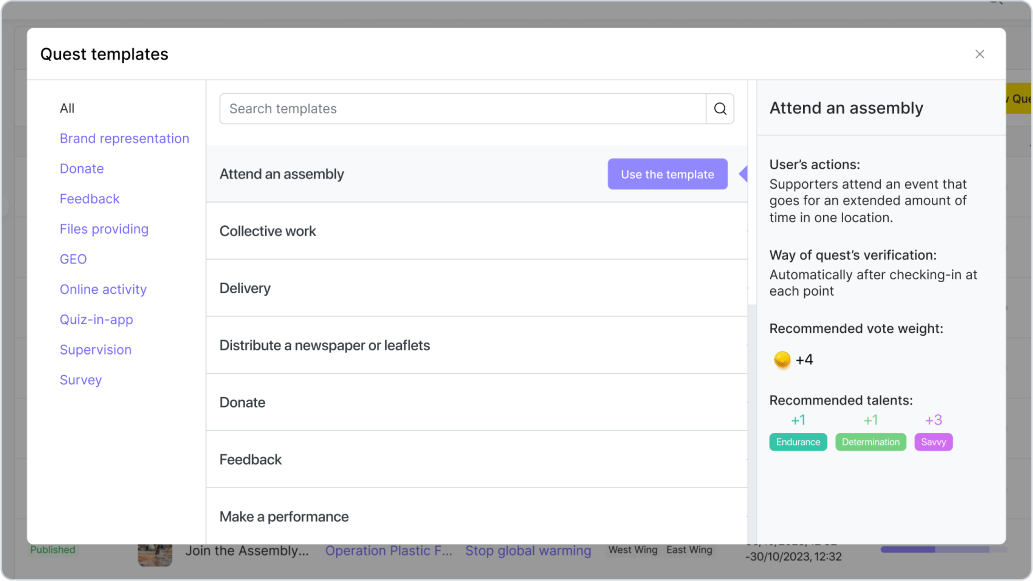
The main feature of Qela is quests and campaigns that are connected to the useful tasks a volunteer can do for an organization — from signing a petition to organizing a neighborhood event. We have 18 templates of different activities that you can adjust to your needs.
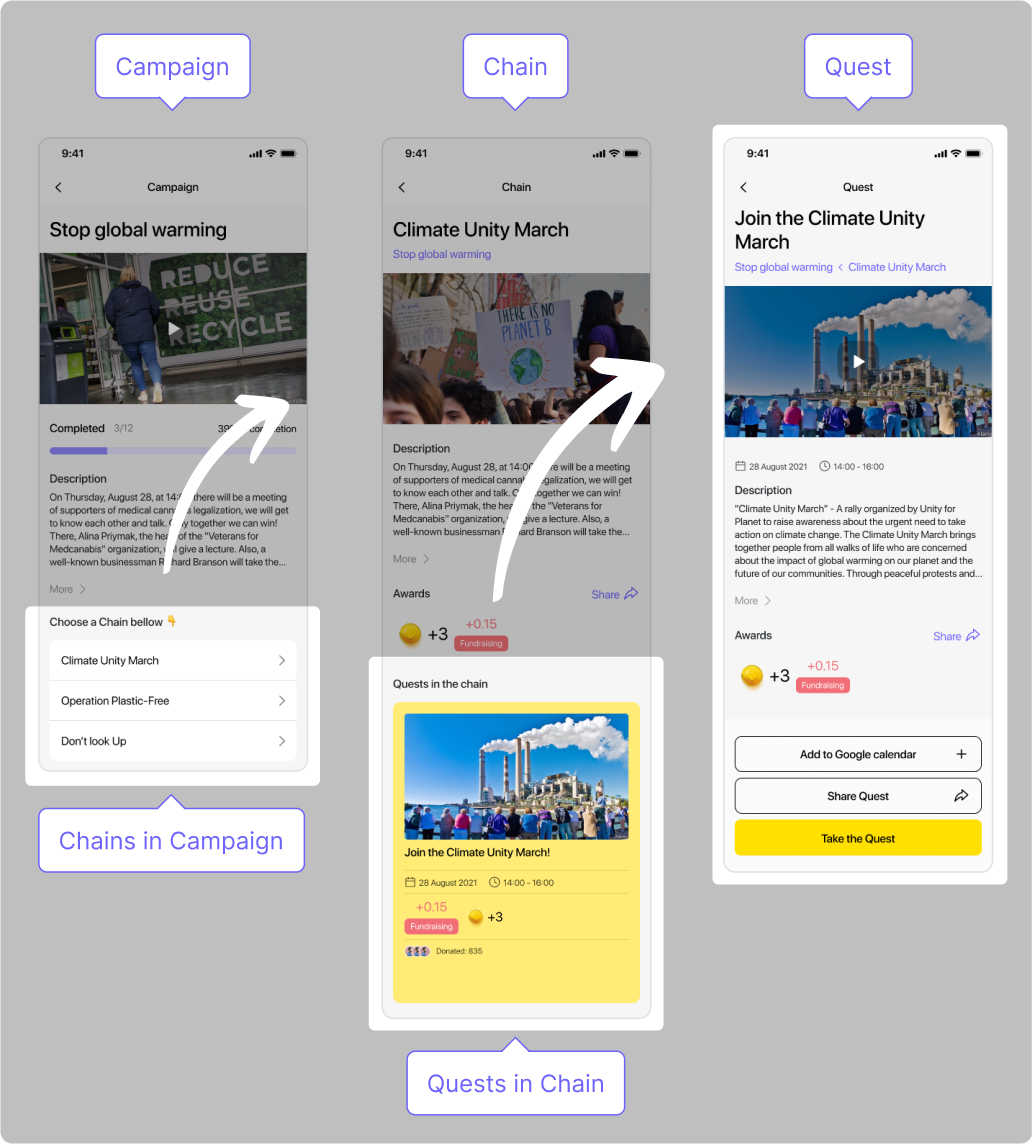
It works like this: major goals that an organization hopes to achieve become the basis of campaigns. Then they are broken into smaller milestones —
chains — and filled with quests a.k.a easily attainable actions that supporters can take to help your organization achieve its goals.
Targeting
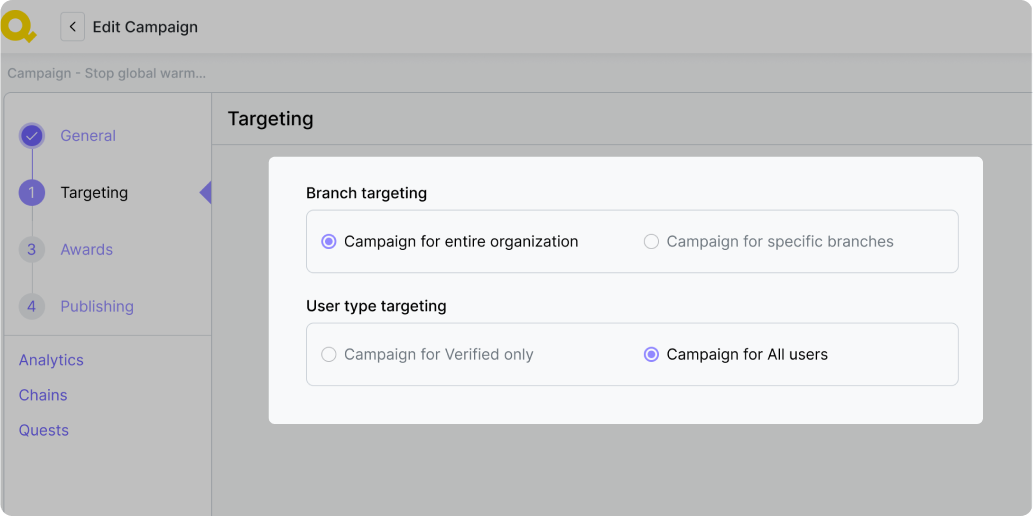
Targeting gives you the opportunity to aim any campaign, chain, or quest at those supporters who fit the criteria you set and who will more likely be able to complete the task at hand. For example, people who are in the specified location, who have certain talents, belong to a certain group created by you, etc.
You can target any campaign to the entire organization, certain branches, all users, or the verified ones only. Chains and quests in that campaign will be aimed at the same users as the entire campaign.
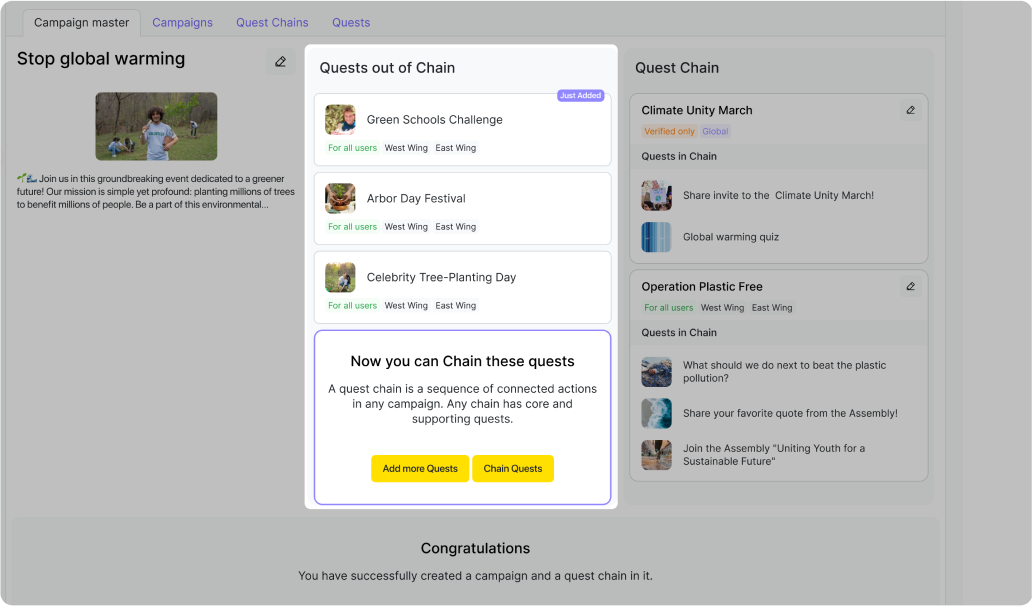
Campaigns
Campaigns are based on the major goals of the organization that it’s trying to achieve with the help of its supporters. They are usually stretched in time and divided into quest chains. Here’s an example of a campaign for an environmental organization.
“Millions Trees for Millions of People”
"Millions Trees for Millions of People" is a transformative initiative dedicated to planting millions of trees worldwide for the benefit of millions of lives. This green revolution aims to combat climate change, support biodiversity, and enhance the well-being of communities. Join us in this movement to make a positive impact on the planet and create a greener, more sustainable future for all. Get involved by planting trees, volunteering, donating, advocating, and educating others about the crucial role trees play in our environment. Together, we can sow the seeds of hope and renewal for generations to come.
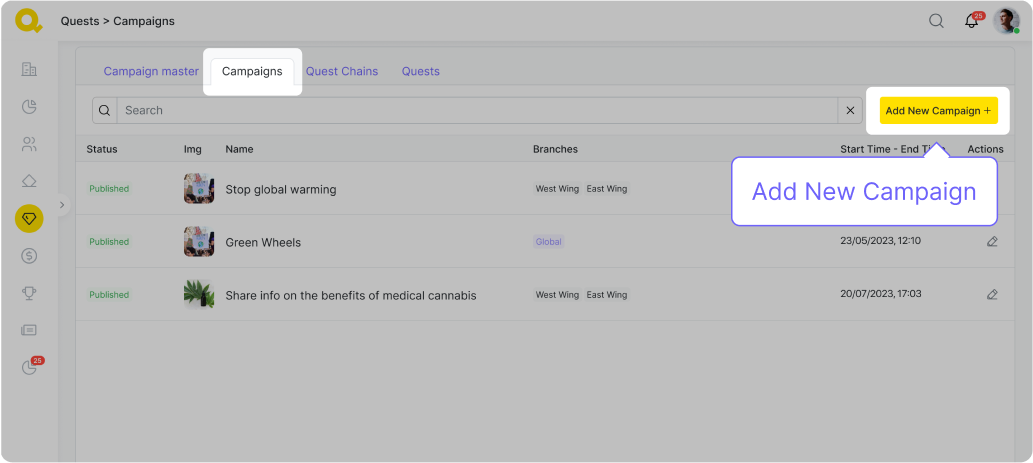
You can add new campaigns pushing the button “Create new campaign”. With "Draft" status
- you can edit all fields With "In porgress" status:
- you can edit next fields - "Campaign Name", "Description", "Main image",
- you can edit Campaign Start Time,
- you CAN'T edit "Targeting" step.
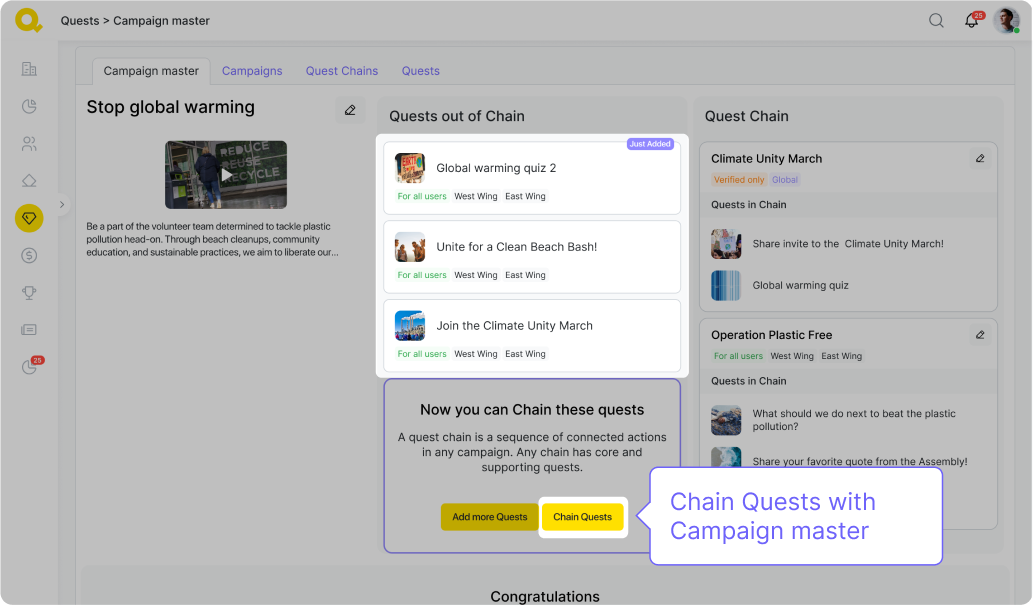
Quest chains
You can group quests into chains to create more logical and engaging journeys for your supporters. It might be helpful to build chains using this logic: introduce supporters to a problem — educate them about it — ask them to participate in an event/organize something themselves — ask them to share information about the problem — gather feedback.
We suggest creating quest chains out of at least three and the most of ten quests.
Here is an example of a quest chain:
Quest chain “Learn about urban greenery — create more of it!”:Quests: Online meeting attendance — Quiz with text — Share organization's social media post — Display the symbol in your neighborhood or on your property — Collective work — Post smth on social media
With "Draft" status
- you can edit all fields With "In porgress" status:
- you can edit next fields - "Campaign Name", "Description", "Main image",
- you can edit Chain Start Time,
You can’t edit the targeting options on a quest chain — the target audience is decided by the campaign this chain belongs to. The same goes for individual quests.
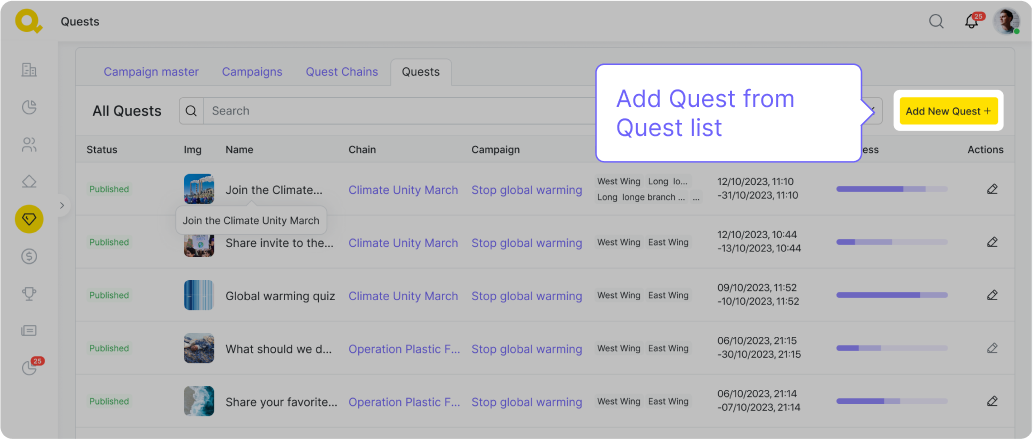
Quests
Quests are easily attainable actions that supporters can take to help your organization achieve its goals. We have created 18 templates for quests that you can use as a building block for your campaigns. We suggest gathering quests into quest chains, but you can also include individual quests into campaigns on their own.
Create New Quest
You can create quests by pressing the “Create New Quest” button.
With "Draft" status
- you can edit all fields
With "In porgress" status:
- you can edit next fields - "Campaign Name", "Description", "Main image",
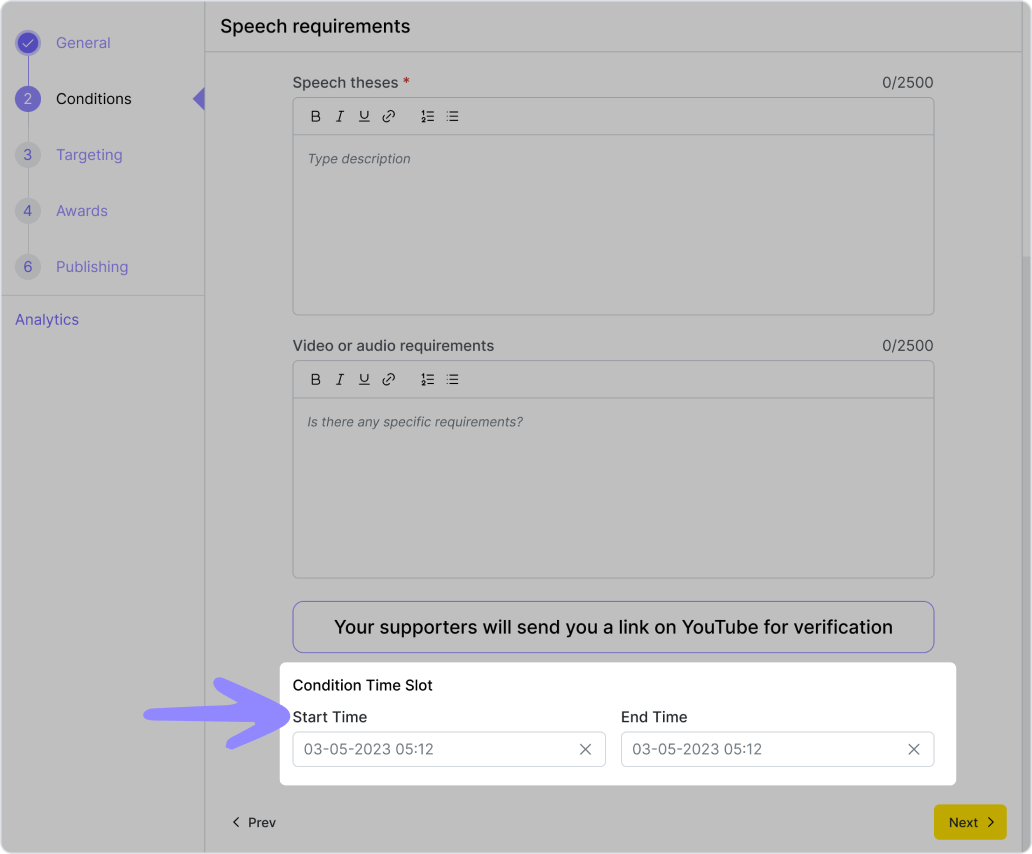
- you can edit Condition Time Slot (Start Time and End Time)
- you can edit user limit on "Targeting" step - more in "User limit",
- you CAN'T edit connections between quest and chains, quest and campaigns,
- you CAN'T edit connections between quest and branches,
- you CAN'T edit quest targeting (for all users or only for verified only)
You can allow your supporters to take a quest only once or make it recurring. You can choose how many times and how often the quest can be taken.
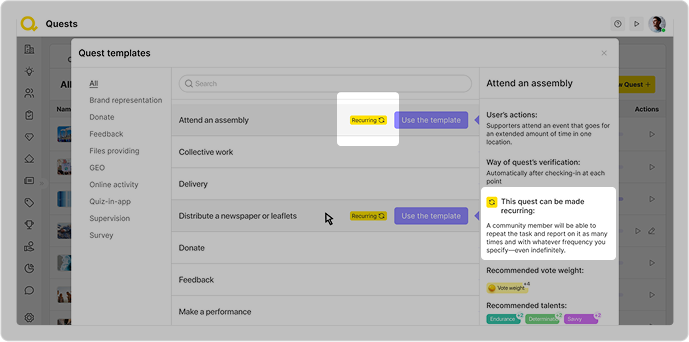
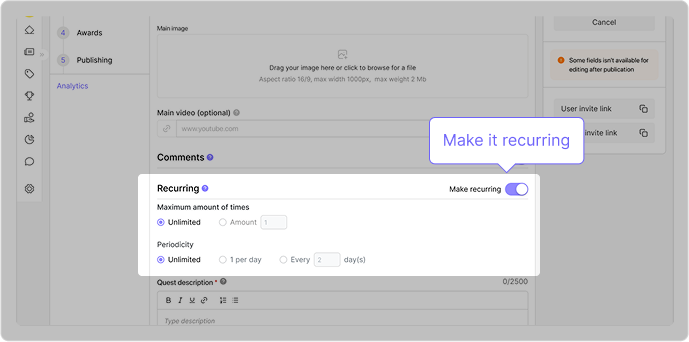
Not all quests can be recurring, though. Here is a list of quests that can only be taken once at a time:
- Survey
- Feedback
- Quiz with text
- Quiz with video
- Sign a petition
- Watch the video
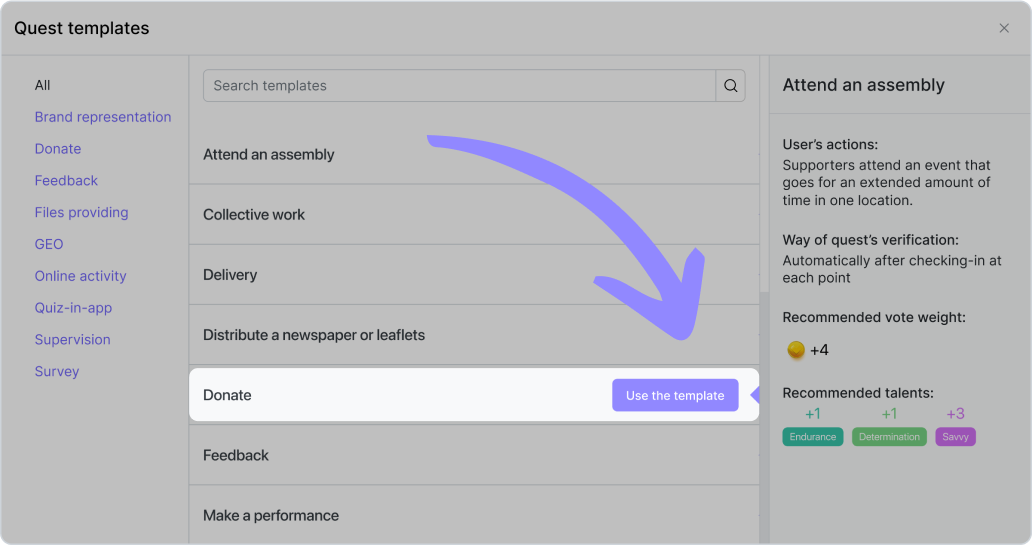
Each template has a short description of what this quest is about and how to better use it. Different quests have different conditions that you will have to fill out when creating it — like, address, supervisor’s name and phone number, QR code that supporters will have to scan, etc. There are nine types of quests that require you to put in different conditions:
Brand representation
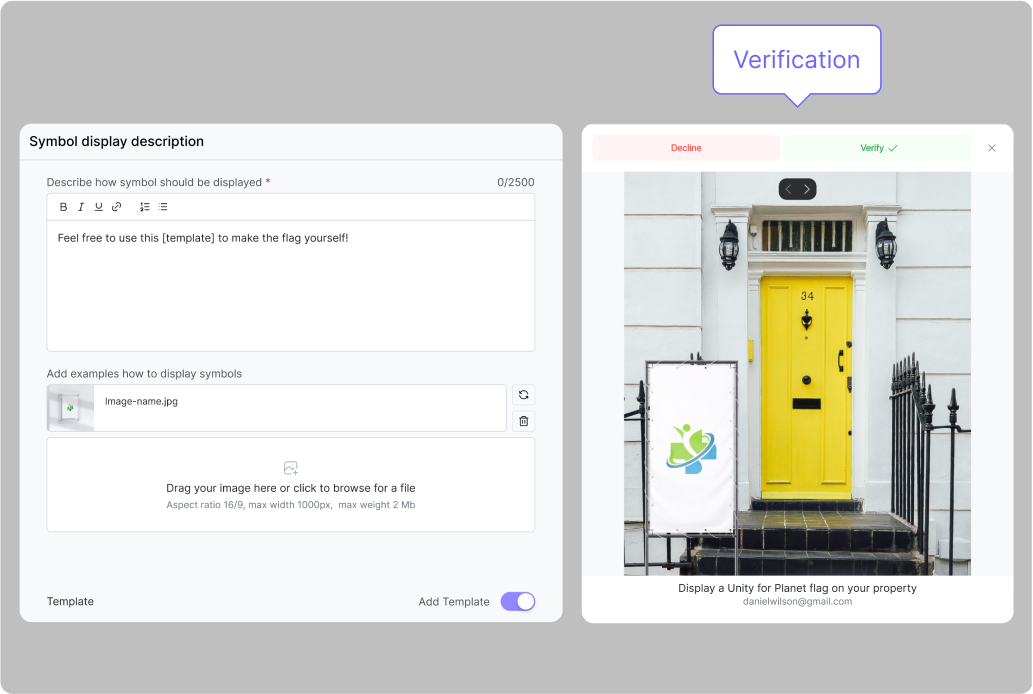
Display the symbol in your neighborhood or on your property: For this quest, you should give your volunteers specific instructions about what, where, and how should be displayed. People will then send you photos of the symbols that your admins will need to verify.
Donate
For this quest, you will need to provide supporters with a link to a source where they can make a donation to your organization. You will then verify a screenshot of this donation.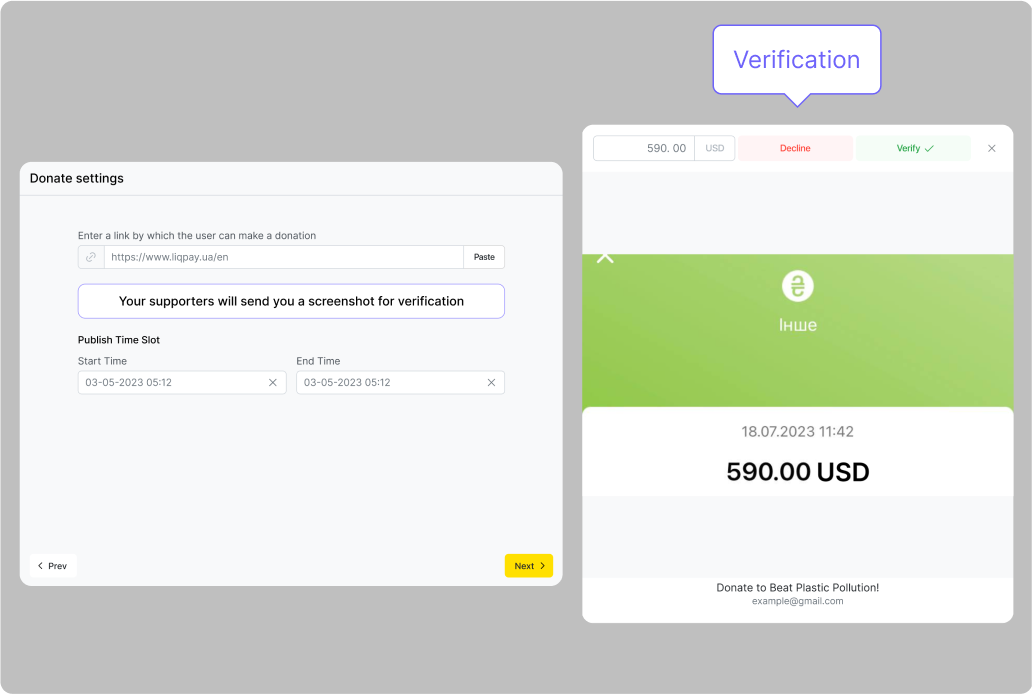
How it works:
- Creating a Quest Go to the Quest menu and select the “Donate” template.
In the "Conditions" tab, you must specify the link to the payment system through which your organization collects funds. Also, the condition for completing the quest is indicated here - a user must send a screenshot of a successful transaction (or a photo of a bank check) before the time specified by you, which will confirm their donation.
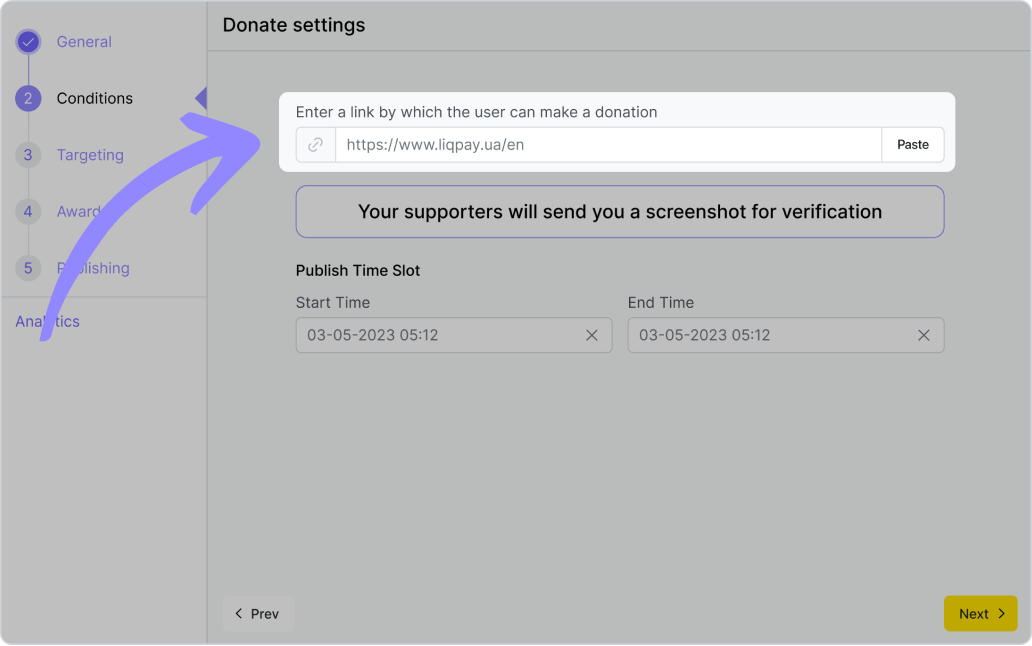
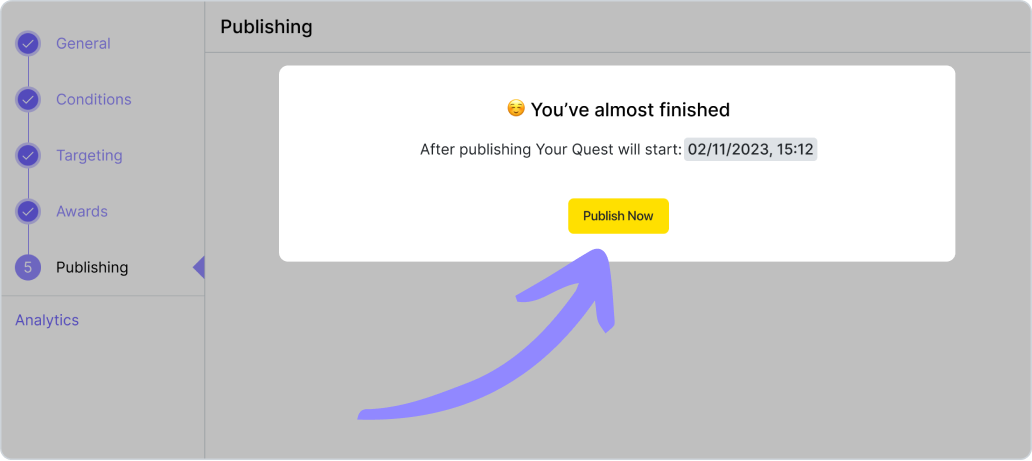
If all tabs are filled in correctly and there are no errors, you can publish the quest.
- Completing the quest
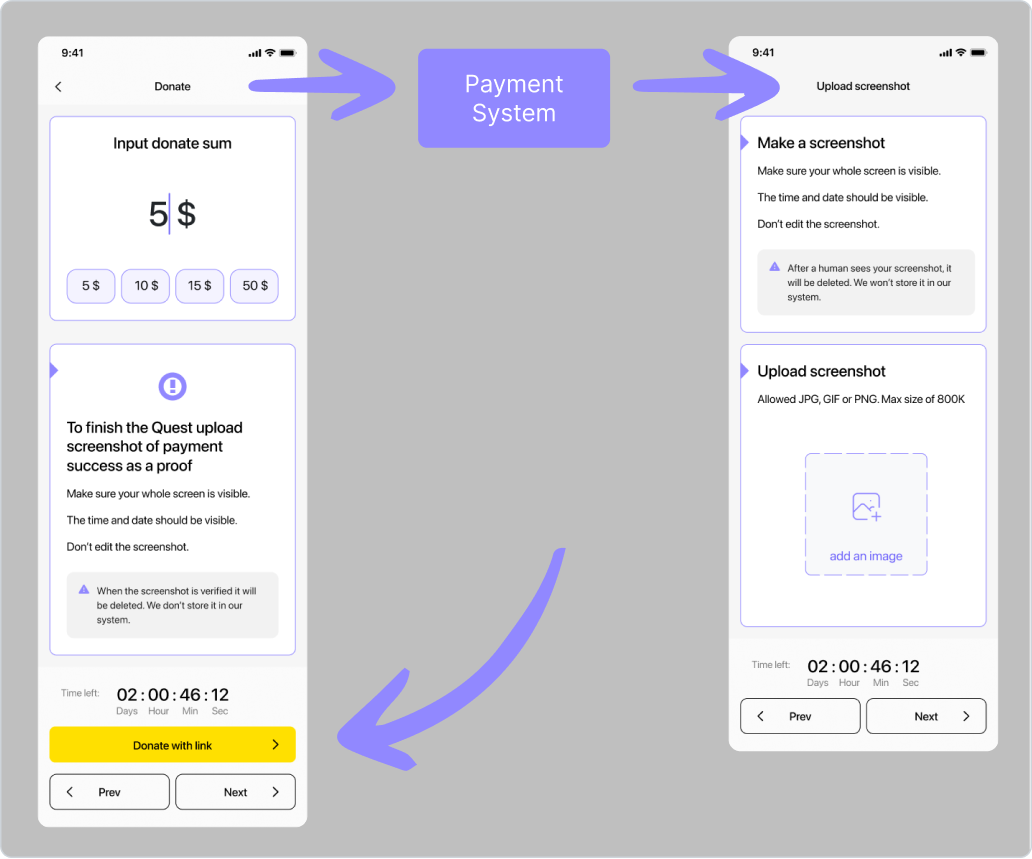
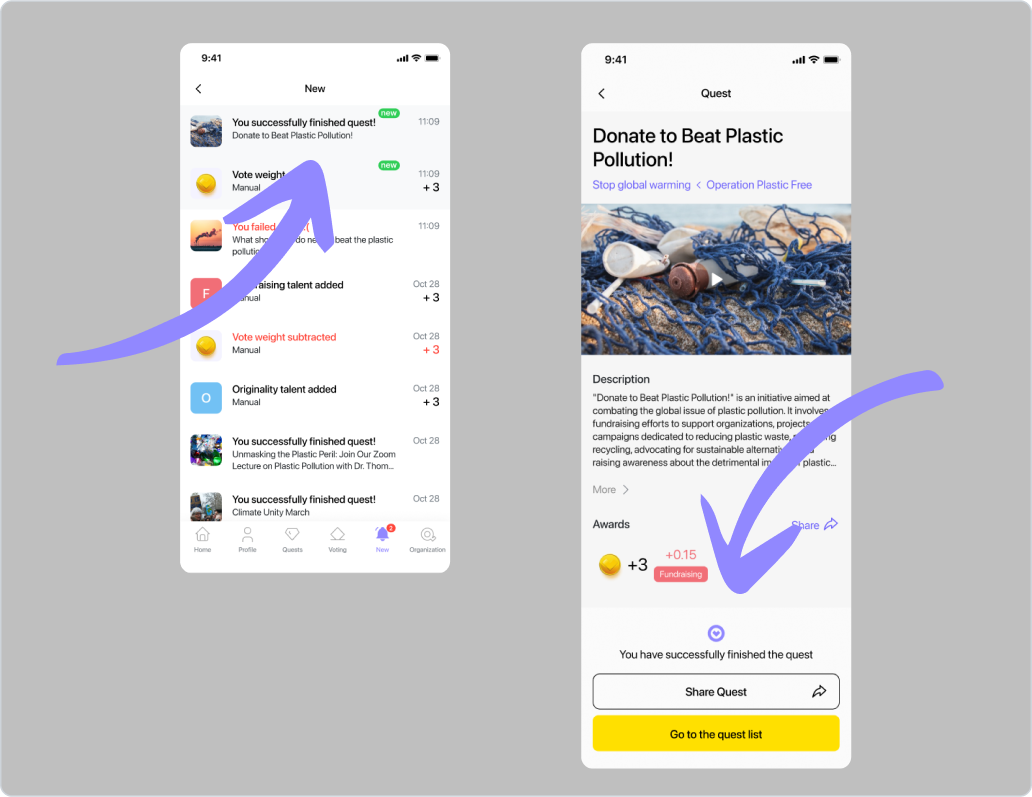
After clicking "Take the quest", a user gets to the screen of the quest execution. On it, they can choose the required amount and the conditions that must be fulfilled in order for the quest to be considered completed. By clicking the "Donate with link" button, the user goes to the page of the payment system, where he transfers funds. After clicking Next, a user gets to the screen for fulfilling the condition — uploading a photo of a successful fund transfer operation.
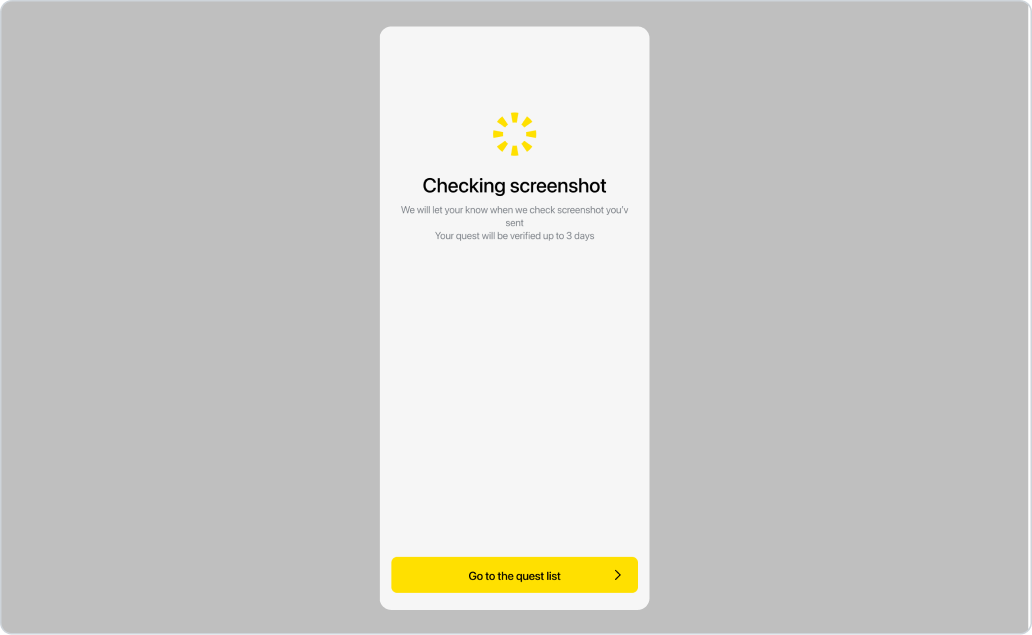
After that, the user sees that the screenshot he sent has been successfully submitted to the administrator for verification. 3) Verification of the quest After the user has successfully submitted a screenshot for verification, you will see that you have a new task in the Tasks section of the control panel.
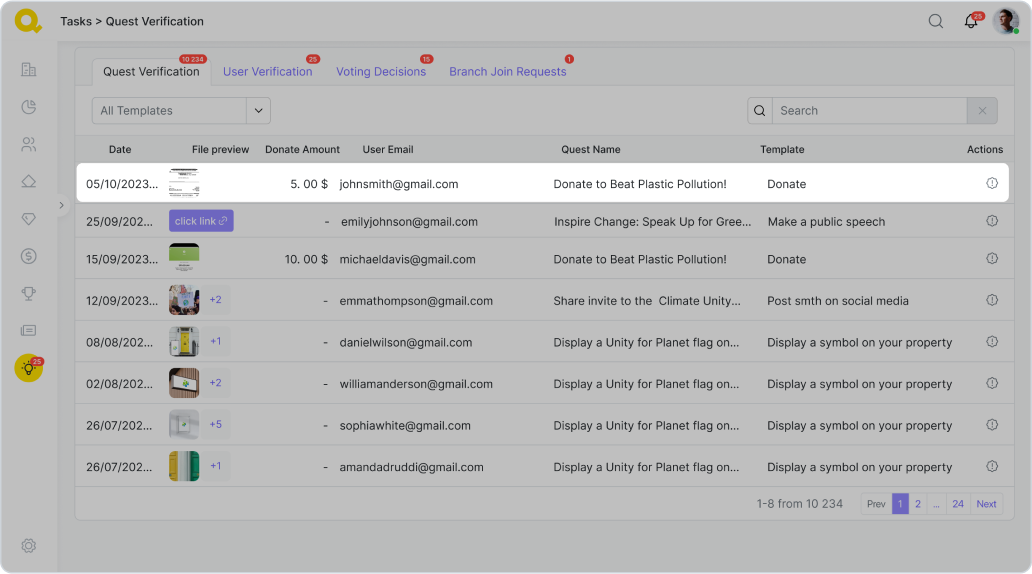
In the "Quest Verifications" tab, there’s now a request for verification of the "Make a donation!" quest.
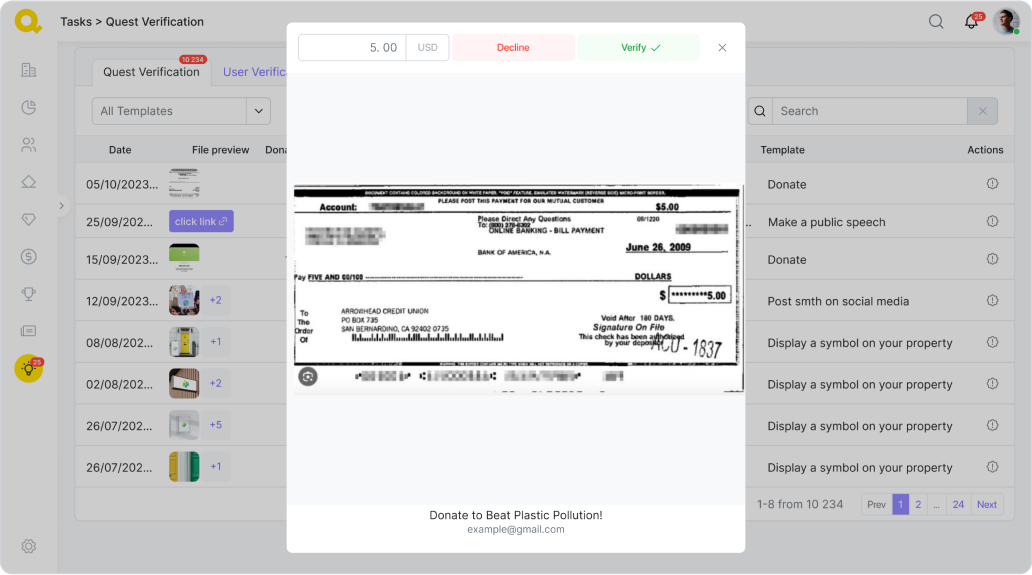
You will see the screenshot sent by the user, with the following actions: Entering the amount of money indicated on the check; Reject verification — for example, if the user submitted an unclear or inappropriate image. In this case, the user will receive a notification that he needs to repeat the verification attempt. Confirm verification — in this case, the user will receive a notification that the screenshot has been verified and the quest has been credited.
Feedback
In this quest you don’t have to add any condition — your supporters will just send you an emoji-based feedback automatically through Qela.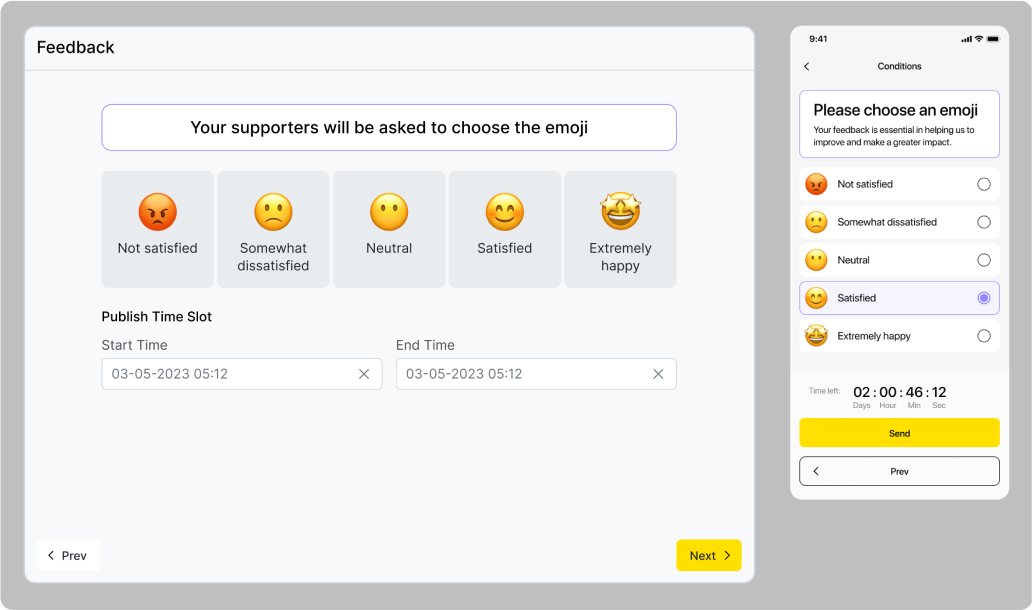
Files providing
Media content provision
Supporters create some media content on a given topic in a specific time and place (e.g. photographs, videos, graphic layouts, etc.). After an administrator manually validates the content provided with a link to some storage.

Geo
Attend assembly & March attendance: These quests use geo-location tracking to verify their completion. For this, you will have to indicate the locations on the map where the event will be taking place. Then users will be able to confirm that they were at these locations at the time of the event using Qela.

Distribute newspapers
This quest requires geo-confirmation as well, but besides that supporters will also have to scan a QR code from a supervisor after they distribute all needed materials. For that, you will have to not only add address of a location for the quest but also a supervisor’s contacts.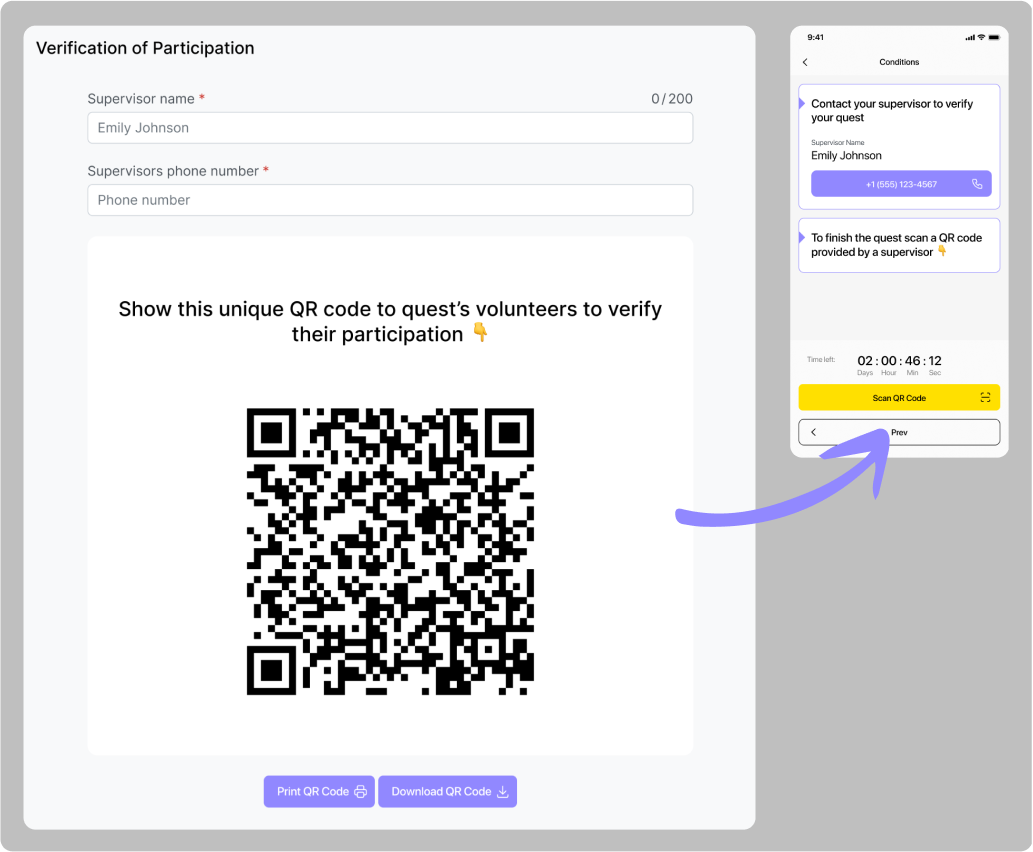
Online activity
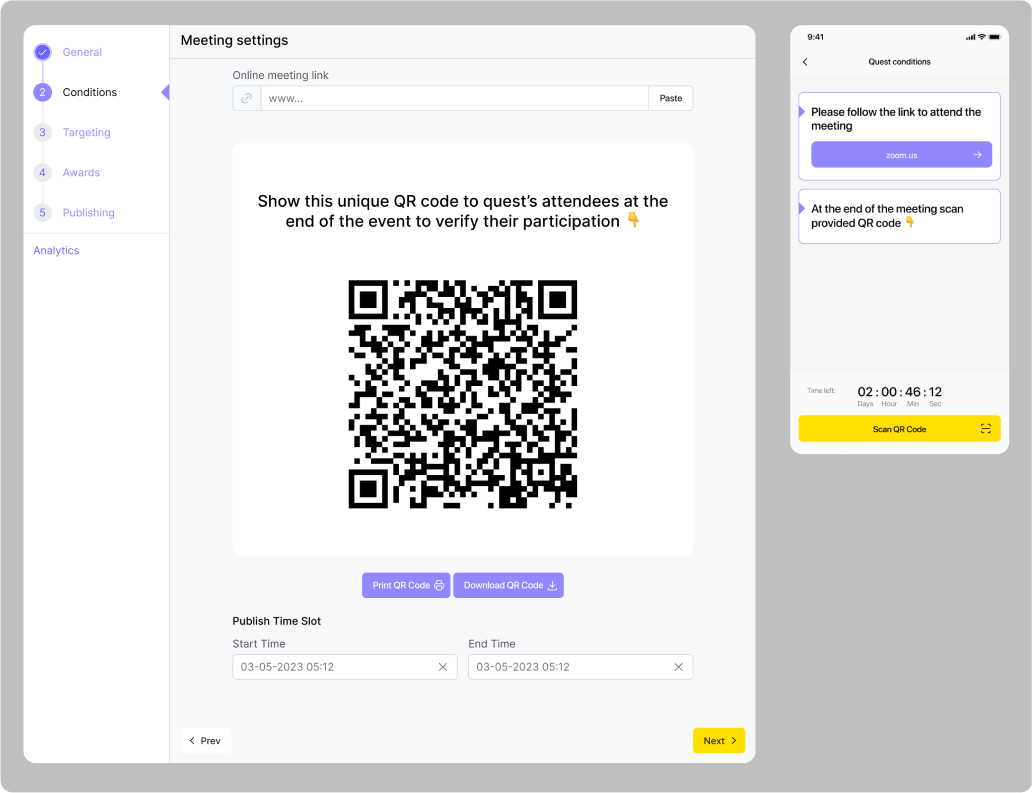
Online meeting attendance
For this quest, you will need to add a link to the event that supporters will be attending. We suggest using MC Teams or Zoom but any online-meeting platform will work.
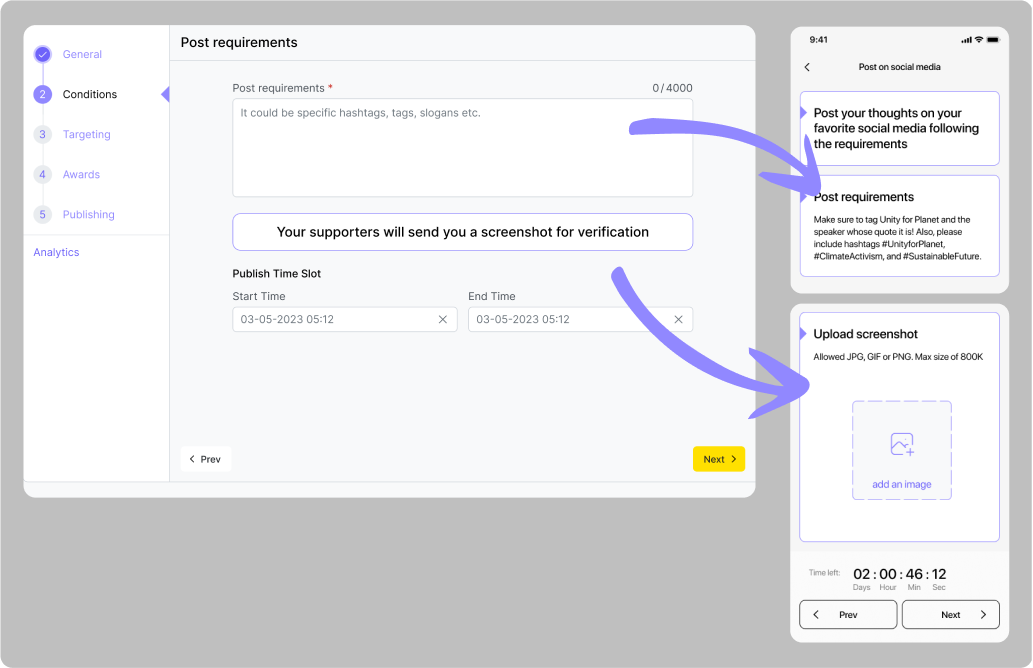
Post something on social media
For this quest, you will need to add requirements for the post.
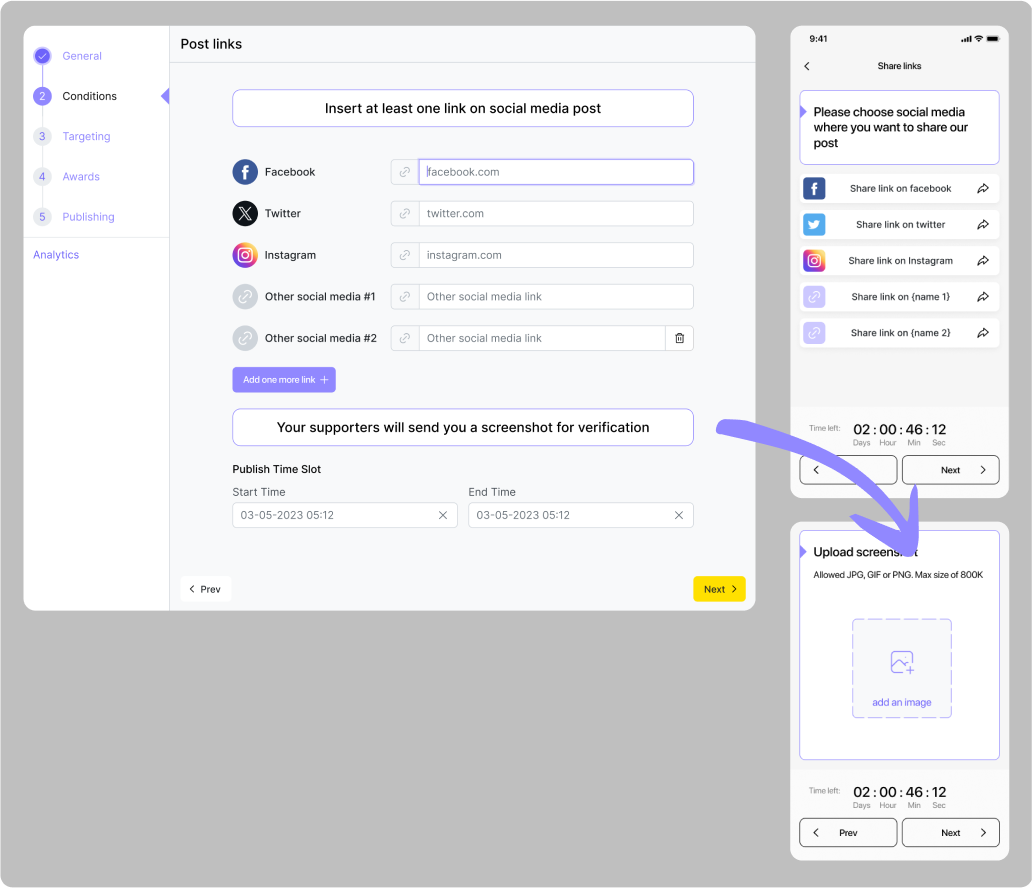
Share the organization’s social media post
For this quest, you will need to provide at least one link to the post that needs to be reposted from your organization’s social media page.
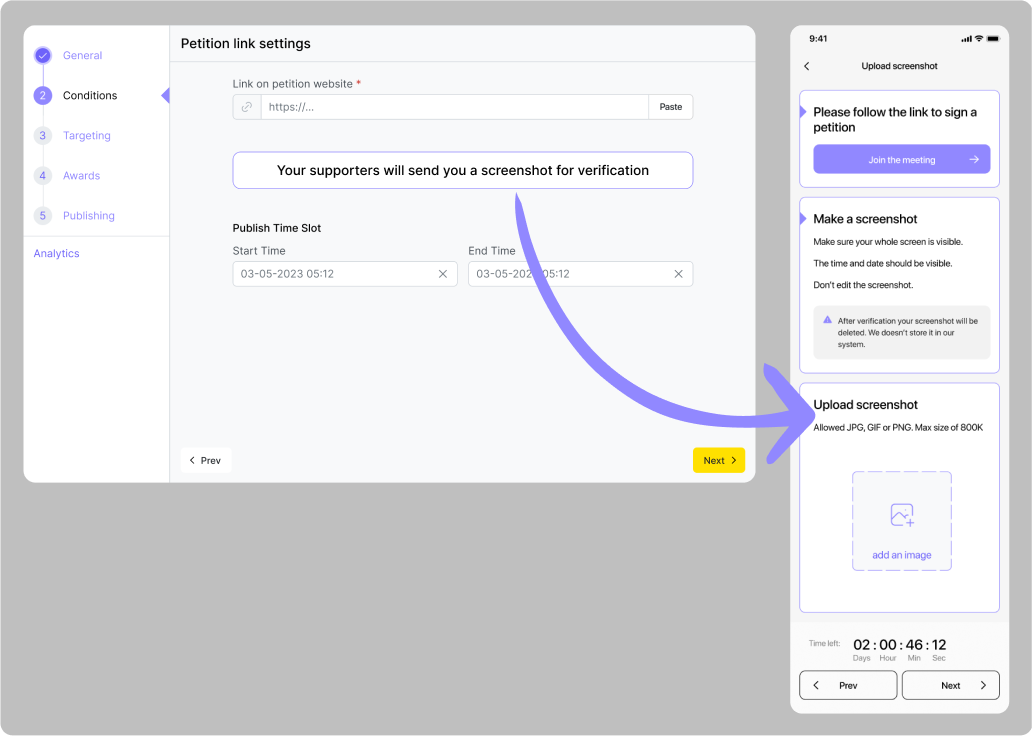
Sign a petition
For this quest, you will need to provide a link to the page where your supporters can sign a petition.
Quiz in-app
Quiz with text & Quiz with video For these quests, you will have to provide a link to the material on which a quest will be based, and add questions that your supporters will have to answer.

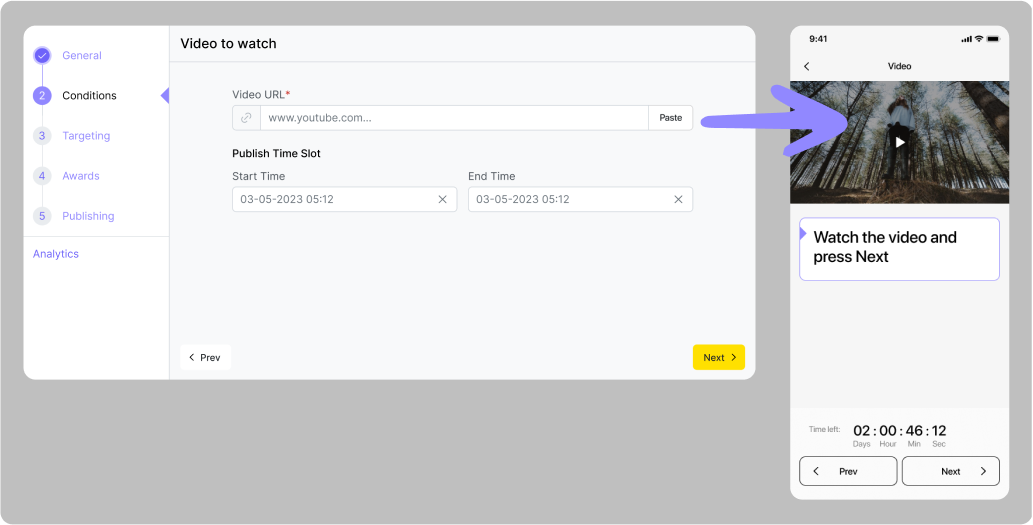
Watch a video
For this quest, you need to provide a link to the video that your supporters will need to watch.
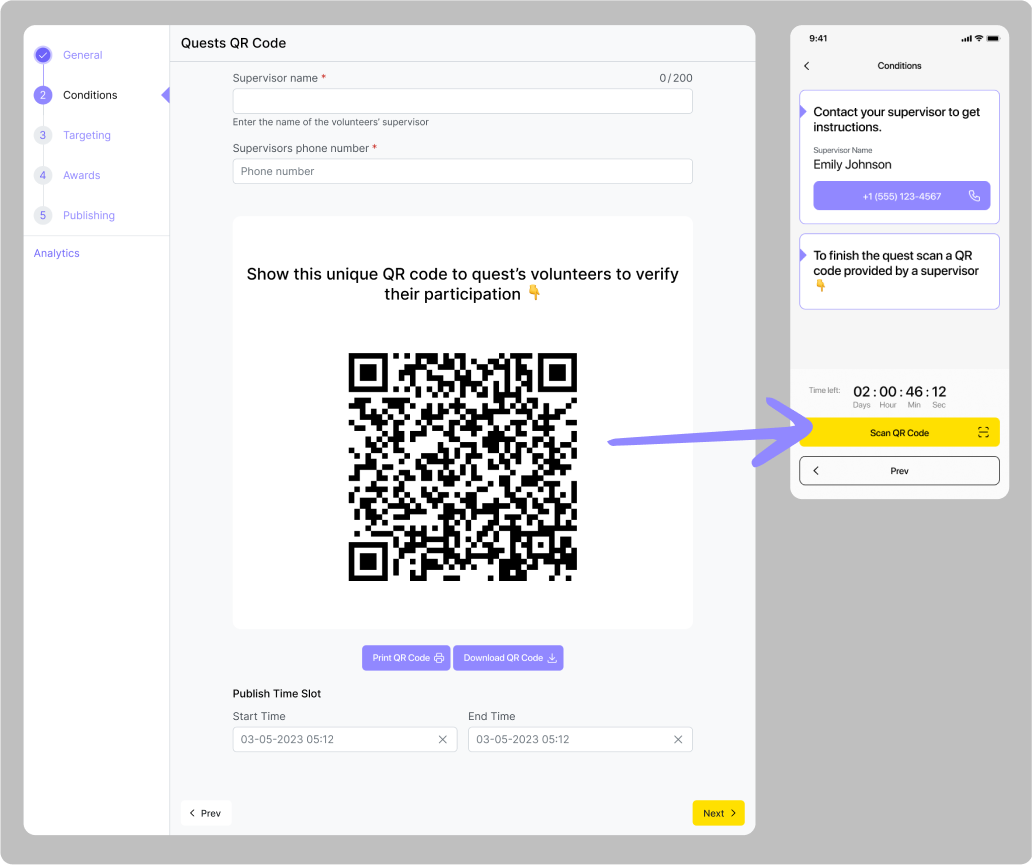
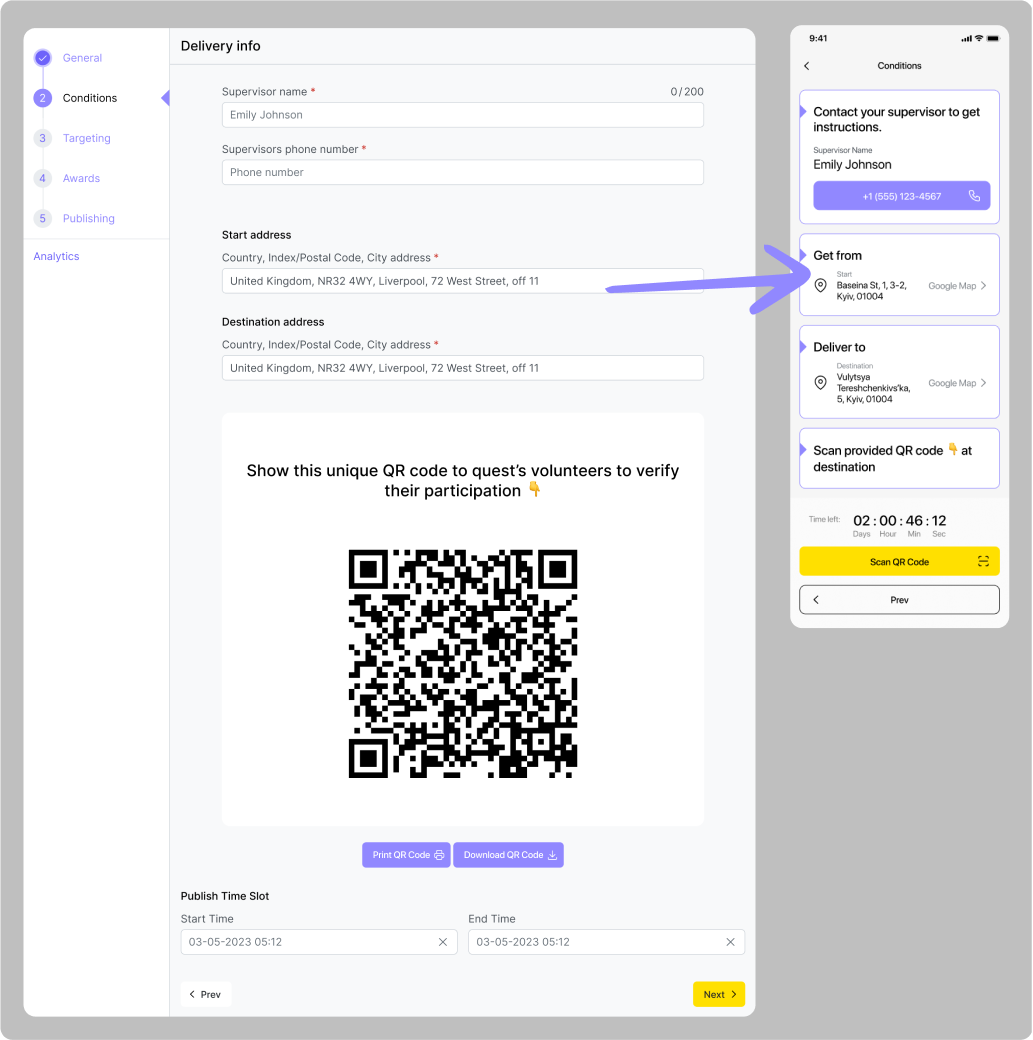
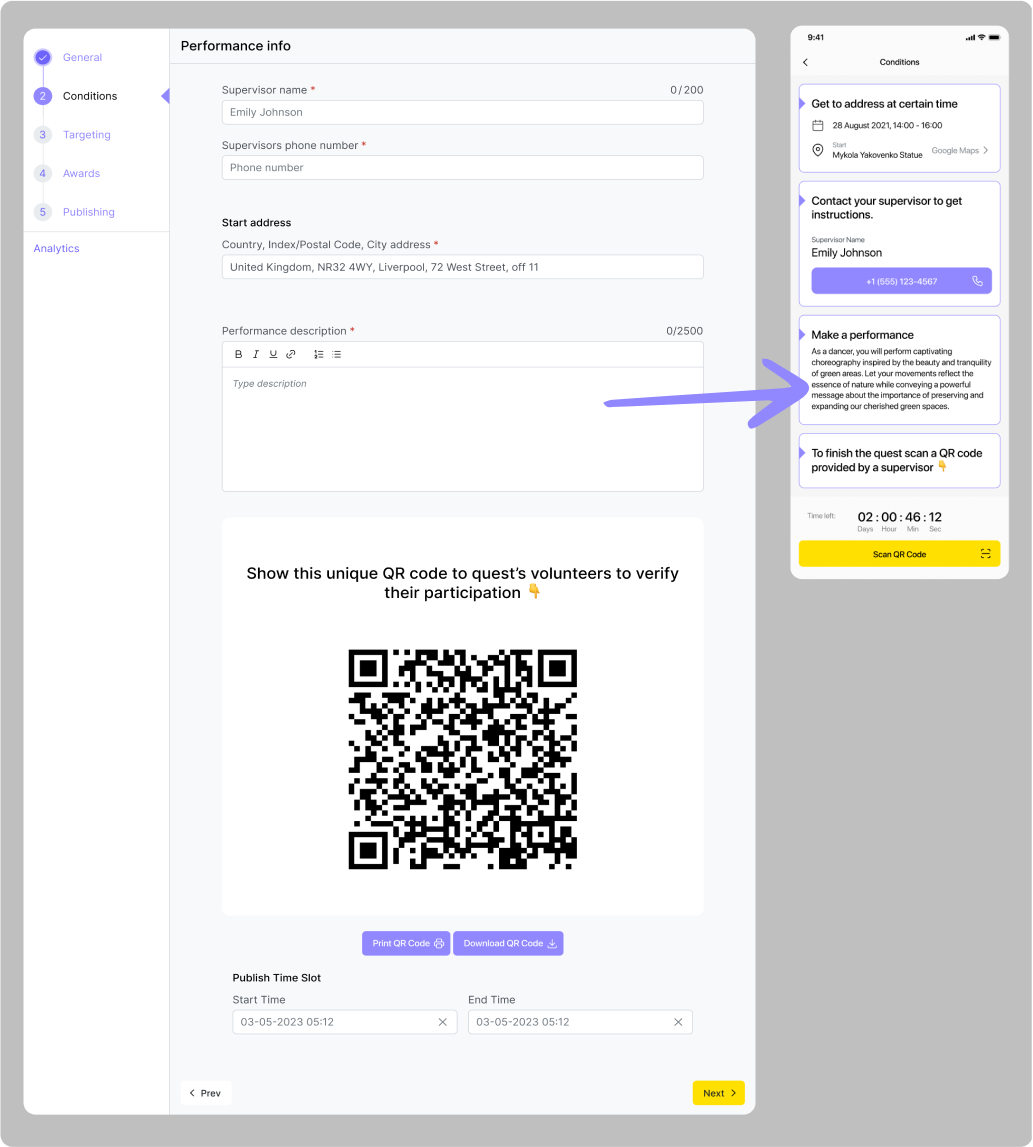
Supervision
Collective work & Delivery & Creative activities: All of these quests use QR code scanning as a verification method, meaning that your supporters will need to see a supervisor from your organization to scan the code and complete the quest. For this, you will need to provide them with the supervisor’s contacts. For the Delivery quest, you also need to indicate the addresses from and to where goods need to be delivered. For Make a Performance quest, you also need to describe the performance you expect supporters to make.
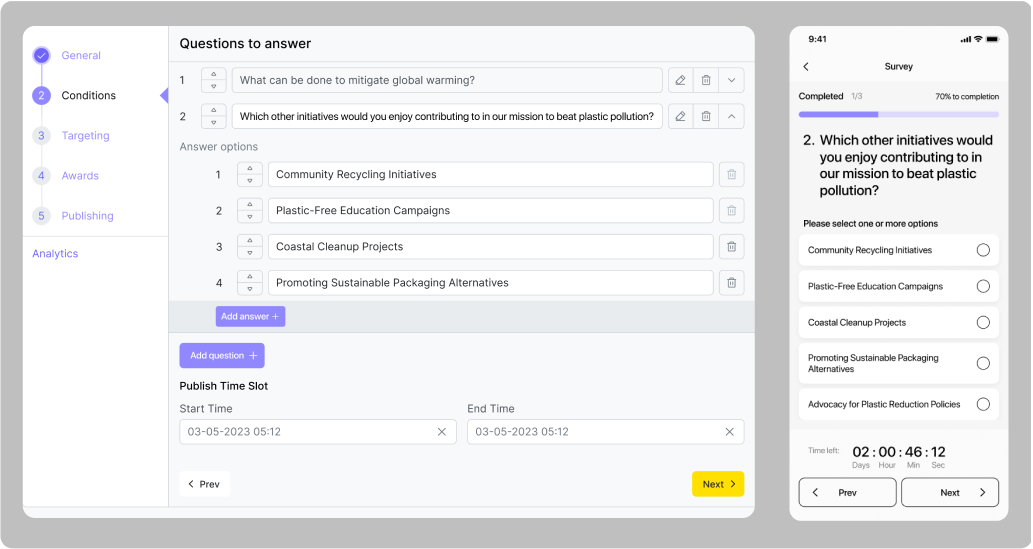
Survey
For this type of quest, you need to add questions that you want your supporters to answer.
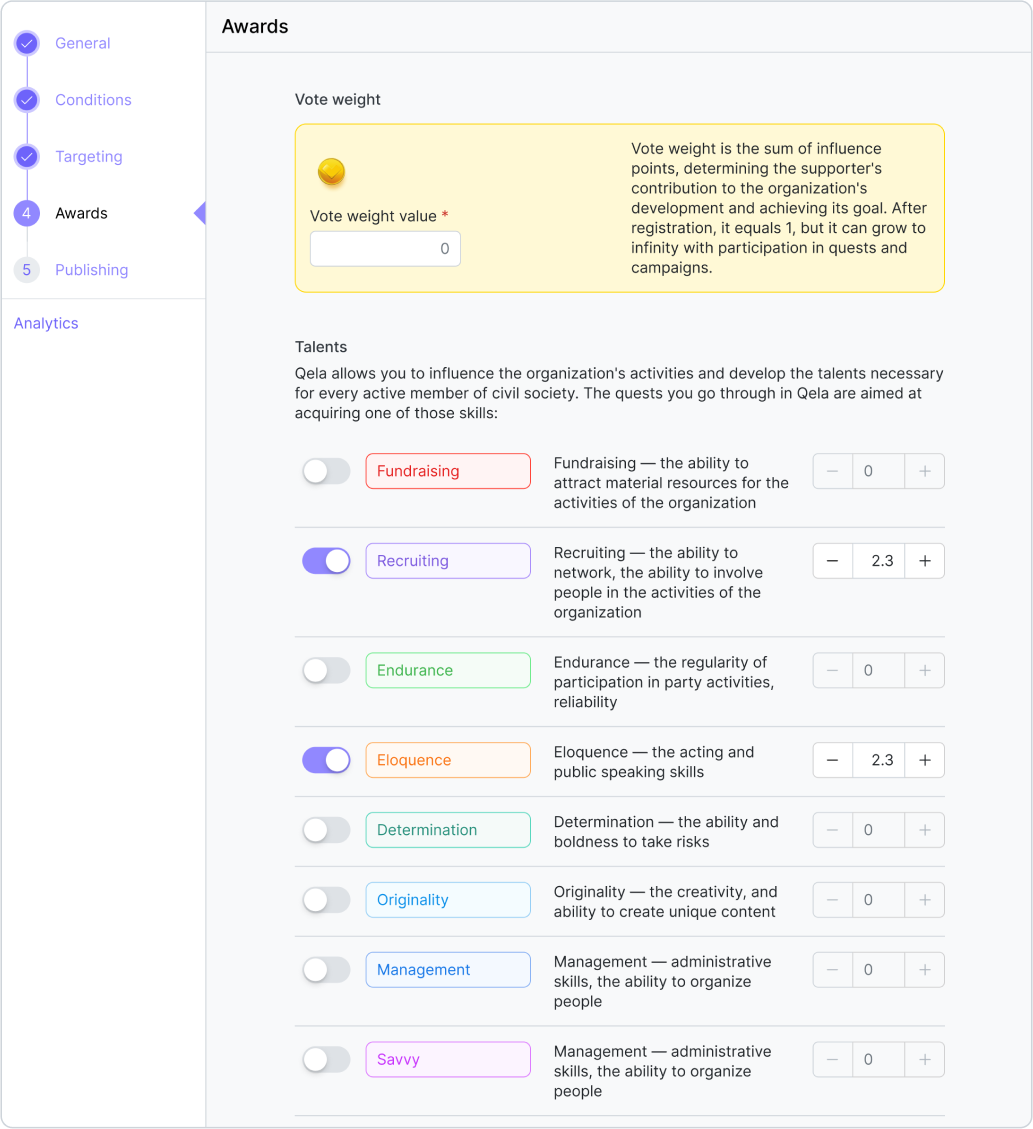
Сompleting a quest has to give a supporter some Vote Weight points and develop some of their FREEDOMS talents. We have suggestions for how many points each quest can give but you can change that number however you want in the “Rewards” section of quest creation. The maximum number of points for each talent that a person can get is 1000. However, we include a special limitation to prevent the accumulation of a large number of points in the hands of a few people and also to stimulate active supporters to stay engaged. After a volunteer acquires 250 points for a talent, they will only get 75% of the talent points indicated in a quest that they take. After they acquire 500 points, they will only get 50% of the points indicated in the quest, and only 25% after they have 750 talent points.
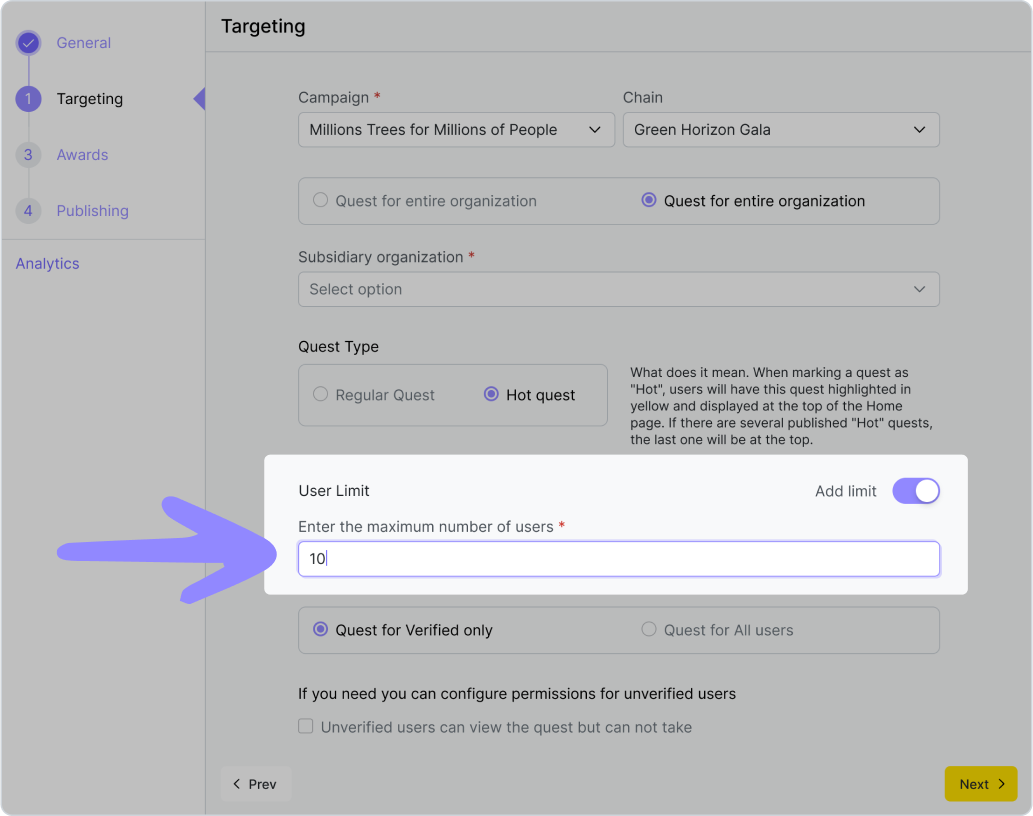
User limit
With some quests, you might need to limit the number of people needed to complete the quest (for example, in a delivery quest). In this case, you need to target it to a certain number of users. To do this, tap on a slider in the “Targeting” tab and enter a number.
If you need to change the max number of participants after quest’s publication, you have to disable the existing limit and then re-enable it. After this you will be able to change the number but it has to be bigger than the number of people who have already participated in this existing quest.
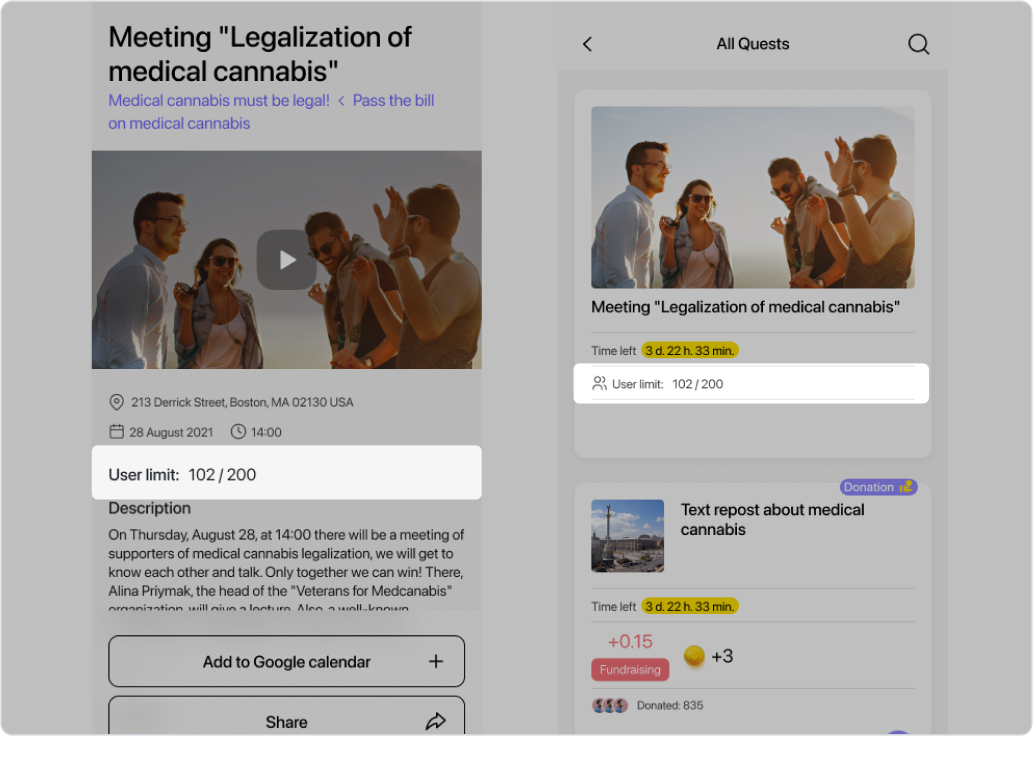
Your supporters see these changes like this: in the list of available quests, users can see how many people have already taken them and max number of participants for each of the quests.
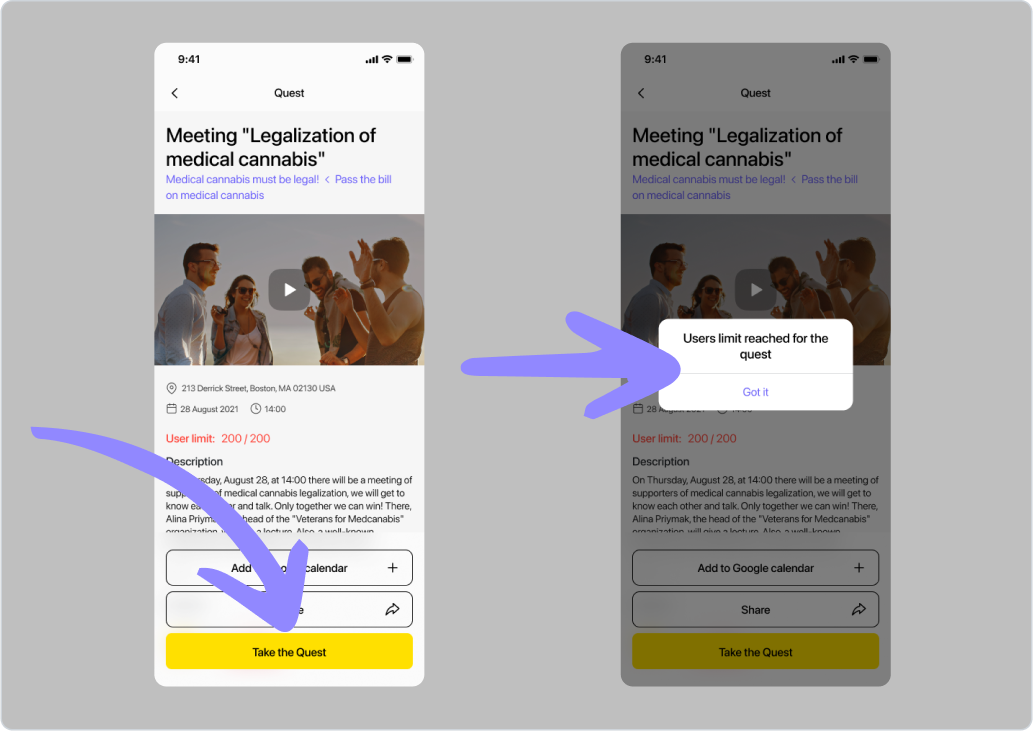
If a supporter wants to participate in a quest that has reached its participation capacity, they will receive a following pop-up message.
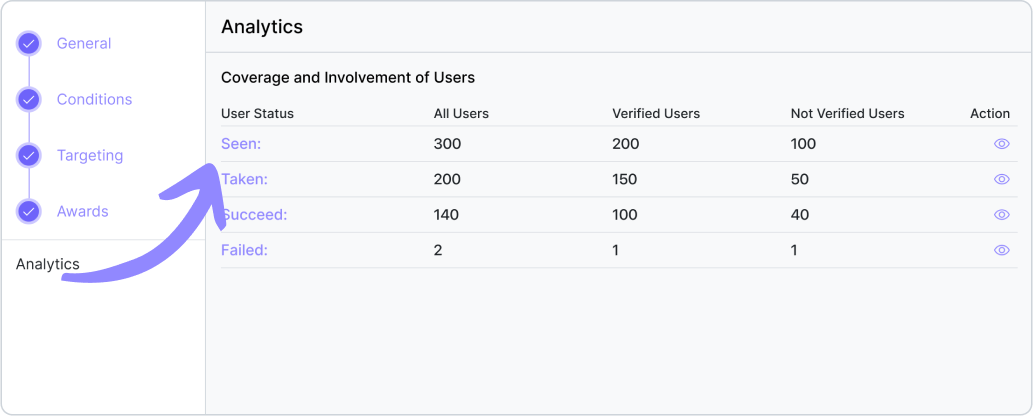
If you need to contact users participating in the quest, you can see information about them in the "Analytics" tab of quest’s editing page. In the “Taken” tab you will see everyone who signed up to the quest, you can write them an email easily using the “Send email” button.


We recommend setting the max participants number slightly higher than how many people you actually need to complete the task. Always calculate in the fact that people might decide not to show up in the end.
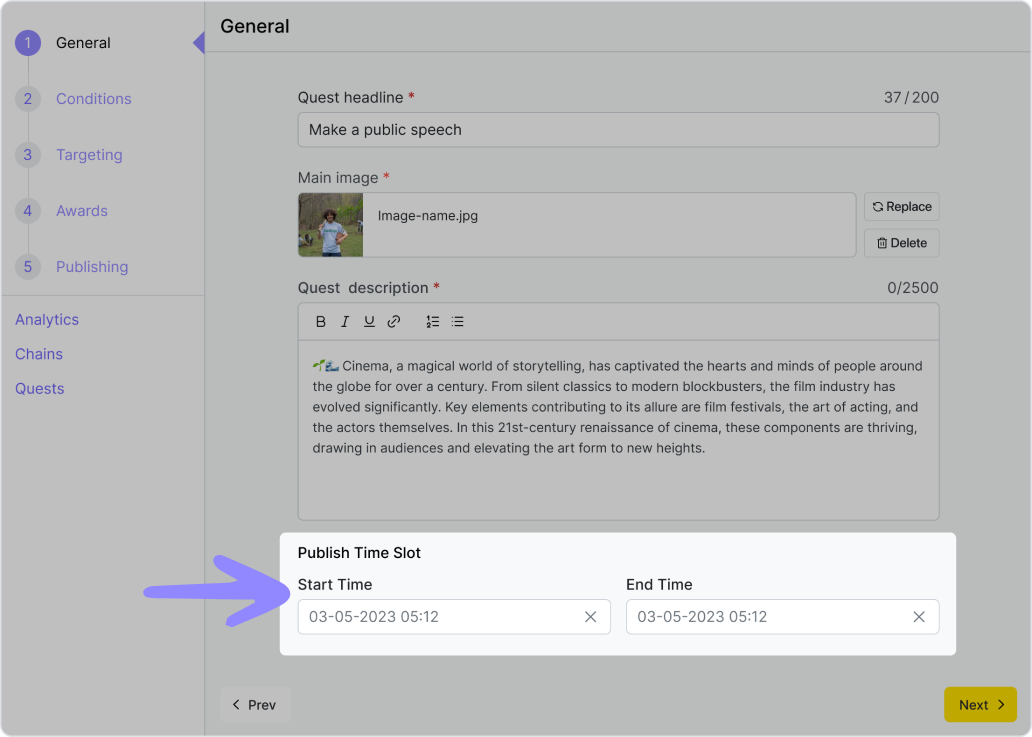
Condition and publish time slots
Publish time slot is a time interval that determines for how long the quest will be displayed in the app for users. One can set the conditions settings when creating a quest. It can’t end before the condition time slot.
Condition time slot is a time when users have the opportunity to complete the quest. It is set in the main settings of the quest and can’t be longer than the publish time slot.
Example: The organization decided to organize a demonstration that will last for two hours starting at noon on 15.06.2024 at the address Khreshchatyk 36. The administrator of the organization creates a geo-quest in which they indicate the address, and fill in all the necessary fields of the description, including "condition time slot”. This period should start around 11:30 a.m. on 06/15/2024 so that supporters can start completing the quest a little earlier than the event starts, and end at 06/15/2024 02:00 p.m. For users to have the opportunity to learn about the event in advance, the "Publish time slot" should begin a week before the event, around noon on 06.08.2024, and end on 06.15.2024 at 14:00. Thus, users will be able to see this quest a week before the demonstartion, but will be able to start completing it only half an hour before it starts.